Monday, 22 December 2008

Disable User Account Control (UAC) the Easy Way on Windows Vista

I've previously written about a way to enable or disable UAC from the command line. This is an easier method that you can use to do the same thing from the GUI interface. To recap my earlier article, UAC is ANNOYING.

Note: Disabling UAC will lead to a less secure system, so be warned.
Open up Control Panel, and type in "UAC" into the search box. You'll see a link for "Turn User Account Control (UAC) on or off":
On the next screen you should uncheck the box for "Use User Account Control (UAC)", and then click on the OK button.

You'll need to reboot your computer before the changes take effect, but you should be all done with annoying prompts.

Saturday, 13 December 2008

Simple DC Motor Control Circuit

Notes:
circuit was built to operate a small motor used for opening and closing a pair of curtains. As an
advantage over automatic closing and opening systems, you have control of how much, or how

little light to let into a room. The four diodes surriunding the motor, are back EMF diodes. They are chosen to suit the motor. For a 12V motor drawing 1amp under load, I use 1N4001 diodes.


Thursday, 11 December 2008

Home Work

waduhhh... dapet PR ni dari tiyoavianto padahal PR kul aja blum ada yg selesai,hahaha....
o ya sory ni bru bsa d kerjaiin coz g byak kerjaan(sok sbuk bget)btw ni PR katanya kita d suruh pasang foto temen-temen di blog masing-masing. tapi foto ini adalah foto orisinil dari temen-temen, gak perlu ganti baju.gak perlu nyisir rambut. kalau pas bangun tidur..yang penting foto paling barulah langsung aja foto pake HP or Cam nya...jangan di edit ya..! 

NI Rule Nya:
this is the rules (orisinil from mas yusa):
  1. Take a recent photo of yourself OR take a picture of yourself RIGHT NOW
  2. DON'T change your cloth. DON'T fix your hair, just take a picture
  3. Post that picture with NO editing
  4. Post this instruction with your picture
  5. Tag 10 people to do this
Utk petunjuk rule bahasa Indonesianya :
  1. Ambil foto kita yang terbaru sekarang juga, bisa dengan hp, camera, webcam atau alat lainnya.
  2. Jangan ganti baju dulu, beresin rambut tapi langsung buat foto kita secara alamiah dan langsung.
  3. Foto yang diambil jangan diedit.
  4. Copy paste instruksi ini.
  5. Berikan pr ini selanjutnya ke 10 teman lainnya dan juga buat link ke blog mereka, atau ya tidak harus sepuluh, kurang dari itu juga boleh lah.
  6. Buat link balik ke yang memberi link.
PR ni akan aq berikan ke temen2 ku, yaitu:

Wednesday, 10 December 2008

Power Supply 5V 1A by IC 7805


This circuit power supply 5V 1A by IC 7805.

It easy circuit. For Digital Circuit.

Monday, 8 December 2008


Today I came across this nice online led calculator. It will generate the circuit for you and will calculate the circuit parameters and the current limiter resistor. You have to specify the supply voltage, voltage drop across led, desired led current and click on ”Calculate” button. Several parameters are calculated including:

  • Exact calculated resistance
  • Nearest higher rated resistor
  • Wattage recommendation for the resistor
  • Actual Single LED Current
  • Power dissipated by the LED
  • Power dissipated by the Resistor
  • Circuit’s total current consumption
Online Led calculator - [Link]

Friday, 5 December 2008

The Adjustable Voltage Regulator


Many amateurs have stopped by their local Radio Shack store and have noticed the famous LM317T adjustable voltage regulator. But, did you know that all voltage regulators are adjustable? Yes, any IC voltage regulator can be adjusted to a higher voltage than its fixed voltage by just adding a couple of resistors.

As an example, lets consider using the popular 7805 (5 volt) voltage regulator as a 12 volt regulator. In figure 1, lets assume 470 for R1 which means that a constant current of 10.6 mA will be seen between terminals 2 and 3. This constant current plus a regulator standby current of about 2.5mA will flow through R2 to ground regardless of its value. Because of this constant 13.1 mA, R2 can now be set to a value which will give us a constant 7 volts across this resistor. A resistor value of 533 ohms or 510 (standard value) will give us the necessary 7 volts. With 5 volts across R1 and 7 volts across R2, a total regulated value of about 12 volts will appear across terminal 2 and ground. If a variable resistor is used for R2, then the output voltage can be easily fine tuned to any value greater than 5 volts. The regulator standby current will vary slightly in the 7805 but 2.5mA will yield good results in the calculations. If an exact voltage (within .3 volts) is needed then R2 must be a variable resistor.

To make any fixed regulator adjustable, use the following formula:

Vout = Vfixed + R2(Vfixed/R1 + Istndby)

Vout = Desired output voltage

Vfixed = Fixed voltage of IC regulator (5 volts for 7805 or 1.25 volts for LM317T)

R1 = Assume any value from about 470 to 1K for best results

Istndby = Standby current of regulator (use 2.5MA for 7805 or zero for LM317T)
Common Resistor Combinations for the 7805 regulator:

Vout 
(Approx.) R1     R2
6 Volts 470 100
8 Volts 470 220
9 Volts 470 330
12 Volt 470 510

Incidentally, the famous LM317T adjustable regulator is really nothing more than a fixed regulator with an output voltage of 1.25 volts. Amateurs seldom need voltages below 5 volts so the 7805 regulator is a good choice and it even costs a little bit less than the LM317T.

Monday, 1 December 2008

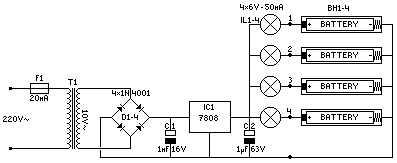
Ni -Cd Batteries Charger


The NiCd charger takes approximately 12-15 hours of charge at 50mA (For AA-batteries).
Only recharge rechargeable batteries (NiCd)

D1-4 = 1N4001
IC1 = 7808 (voltage regulator)
C1 = 1000uF/16V
C2 = 1uF/63V
IL1-4 = 6V/0,05A BULB
BH1-4 = AA BATTERY-HOLDER
F1 = 20mA FUSE + HOLDER
T1 = TRANSFORMER (10V/0,25A)